 Week 10 - Week 15
8/6/2023 - 17/7/2023
Leong Jiahui / 0353469
Bachelor of Design (Honours) in Creative Media
DST 60404/ ANATOMY AND CHARACTER SCULPTURE
Project 2 & Final Project
Instructions
WEEK 11 (15/6/2023)
 |
| fig 1.1 W11 sculpting progress (15/6/2023) |
Feedback:
 |
| fig 1.2 W11 feedback (15/6/2023) |
- do the parts of shoes separately
- structure of feet will be different with heels
- sharpen hair esp sides
- shins smoothen and make it thinner (frontc and sides)
- look up skin tight clothing refs (cotton). skin tight clothing will have folds too
- look up the type of fabric material and study their folds
- skin tight is not exactly SKIN TIGHT to the point where all details are visible. smoothen it a bit more
WEEK 12 (22/6/2023)
Lectures:
holes:
thin material,causes cheesy holes: add thickness-dynamesh
asymmetrical: pinch-dynamesh
symmetrical: can copy paste mirror
skirt:
1.plane
2.del lower subdiv
3.mask
4.del hidden
5. curve bridge
 |
| fig 2.1 W12 progress |
 | |
|
Feedback:
- fix the hanging cloth, make it flowy
- give the character a belt for the cloth to hang on
- maybe stylise the stocking a bit more (consider lace/net)
- consider more accessories (sash?bag?)
- look up more components that could make the character more solid looking. give the character more volume
- give a band to the cloth bracelet
WEEK 13 (29/6/2023)
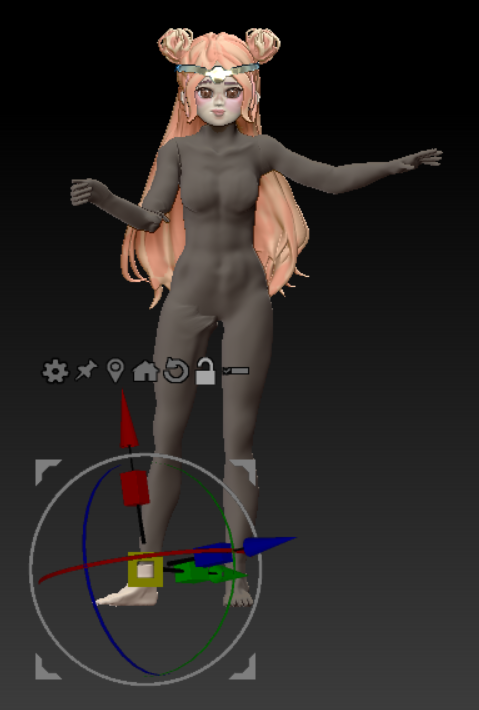
This week is a public. I spent the time exploring and trying out the rigging process. After building the skeleton, I got to work with the pose.
 |
| fig 3.1 rigging process |
And then this happens:
 |
| fig 3.2 what the hell |
WEEK 14 (6/7/2023)
One night of sleep later, I got up and started desperately trying to save all the broken mesh. my temporary solution was to give her a simpler pose that would reduce the number of mesh affected, and attempt to bandaid up the distortion like how I cover up my past mistakes. Not very effective, of course.
 |
| fig 4.1 rigging:3 me: 0 |
After the feedback session, it seemed like masking was my only hope in this situation. Mr Kanaan did show us some rigging tricks on Blender and Maya, but it's week 14. I... I know my limits and sometimes it's best to stick with it. We were also taught how to give lighting to the character and export it as an image so we can make a poster. Yes! We need to make a poster! More on that later.
Feedback:
I quite liked how the pose turned out. It looked like a half bow, and not exaggerated to the point where it's outside my skill level. But then I realised... a lot of problems. I z remeshed this model a couple of times to keep the polycount as low as possible, after getting the idea that that was what messed up my rigging. However, I'm using the masking method right now, and technically speaking it would not have too much of an effect on anything. Not wanting to redo every detail from scratch, especially the face, I decided to change course and restarted.
I worked with the nude model first, to have more control and clarity of how each part goes. I don't know how I managed so far without knowing that you can move the move tool depending on your preferred point of rotation until last week when a friend taught me, but that knowledge changed me as a person.
- give the character a simpler pose
- give the character a weapon
- if rigging doesn't work out, try masking
WEEK 15 (13/7/2023)
On the final strand. Turning to masking, my one last hope, I started posing my character. This method was admittedly a lot easier and wasn't so hard on Zbrush that my laptop starts to smoke.
I wanted to give my character an elegant pose, so I threw and organised everything into folders and started working on the model alone.
 |
| fig 5.1 Posing progress |
With the main goal of minimising the redo of clothing and other detail adjustments, I decided to give my character a simple, more idle pose, with her throwing her skirt up and holding her weapon.
 |
| fig 5.2 Masking posing process |
Eventually, the final pose took shape and I worked on tweaking the clothing to fit their new position. For some that are a bit more troublesome to adjust, I redid them from scratch. But mostly there weren't any drastic changes towards the clothes except her dress.
Next, I gave her a hammer weapon, with quirky details to match. The whole thing is finally taking shape and I couldn't be happier. While I'm at it, I played around with her facial expressions a little, giving her a slightly quirked brow and a slightly arched lip.
Its Saturday. I am hoping to be able to finish this asap, then I went in and gave her more facial details. Besides the previous modifications, I gave her more blush and some freckles to match. With the red lighting, the look feels more emphasized and I'm digging it.
 |
| fig 5.3 final pose |
 |
| fig 5.4 Character turnaround with perspective |
 |
| fig 5.5 Facial details |
 |
But of course, we're not done here. We still need to make her a poster!
I tried giving her a bit of lighting and realised that the light is not lighting because I'm using a matt cap material. Thankfully that wasn't a huge issue and I managed to change everything to the basic material. This also explains why the colours look different compared to the initial shade.
Trying to export the render in a higher resolution was a whole other ordeal on its own, but I managed to extract my model in an acceptable resolution and proceeded with my poster.
I have reached the phase of acceptance right now and really just want to get this over with.
Needless to say, graphic design is not my passion.
Final outcome
 |
| fig 6.1 Final character sculpture turnaround |
 |
| fig 6.2 Final character sculpture turnaround with lighting and different material |
 |
| fig 6.3 detail close-ups |
 |
| fig 6.4 final character poster |
Reflection
In the first half of the semester, this module felt like a warm-up, learning the step-by-step of sculpting every week. Then Project 2 happened, and suddenly I find myself suffering. This was the opposite of the VPD experience, where things seem to get harder every week. After completing the base I find myself reaching the peak of the graph and unable to push forward, hence my weekly progression starts to fall flat, with not many visible improvements made. However, putting sculpting skills aside, one of the biggest lessons I've learned through this module is how important it is to have a support group. Discussing and experimenting sculpting with friends really made the entire process more bearable, and definitely more fun. Many of the issues I faced were solved thanks to my friends (big shoutout to qiao yin, jiaxien and raemi) and the fact that everyone was very willing to help each other out warms my heart.
Sentimental stuff aside, these 15 weeks really made me appreciate sculpting more, and despite the painful journey, I am actually motivated to continue learning and aim to sculpt another model during my semester break and print it on campus next semester. It reminds me of the time I was swearing off Illustrator during my IVN module, and now I use Illustrator on my personal projects all the time. This semester of sculpting crash course has really taught me a lot, and I hope I will be able to continue honing my skills and build more cool models in the coming future.
With that, my final module of the semester is done, signing off ! :D
Comments
Post a Comment