Week 1 - Week 17
23/9/2024 - 19/1/2025
Leong Jiahui / 0353469
Bachelor of Design (Honours) in Creative Media
GCD62104 / MAJOR PROJECT
This project is separated into 3 sections:
The Big Idea
The Prototype
The Showcase
17 weeks of my blood sweat and tears, enjoy!
Instructions
THE BIG IDEA: RASA
Week 1
This week, I tossed around ideas on what I can work on for my FYP. I mainly wanted it to be something I'll have a lot of fun doing, something that won't require too much technical exploration yet still can wow people. My initial plan was an expansion on my previous Design Exploration module, except make it Malaysian, and introduce more characters to the lineup. I'm not too keen on working with 3D, and want to focus more on illustrations. I also thought about working on a Vtuber model to tie the whole idea together.
However, after consulting with Ms Anis, apparently Vtubers are a no go among lecturers. She encouraged me to work more on 3D as that will be the skillset the industry will be looking for (oh naur) On one hand I'm flattered that ms seems to be confident in my skills and believe that I can do more, but I'm not sure if I believe in myself all that much yet hhh.
After more discussions, I decided that hell, I can't be doing this alone. I recruited my fellow ED friend Raemi, and we decided to work on a set of blindbox figurines together, combining character design, 3D modelling and branding all in one. We wanted to produce the figurines physically as we felt it was always more attractive to have something physical to show at an exhibition. I'm not straying too far from my Malaysian theme, but we really liked the kuih-muih theme Ms Anis suggested. It's cute, niche, and most importantly, representative of Malaysian culture.
It may be week 1, but we got straight to work to come up with mood boards and concepts to solidify the idea. We are optimistic about the idea, and excited to work on colourful kuihs together.
 |
| fig 1.1 week 1 brainstorming |
 |
| fig 1.2 FYP timeline skeleton |
Week 2
This week, Raemi & I continued working on solidifying our ideas after feedback from Ms Anis & Mr Kannan. After receiving comments that our idea should be expanded further as an IP to have better sustainability as a brand in the long run, we started brainstorming potential character lore and world building. With help from our trusty not so secret 3rd member Mr ChatGPT, we decided that we could potentially turn this project into a series of collectible figurines, something resembling the Sylvanian families. We also decided to package them as a series part of the "Guardians of Malaysian Heritage", where they each represent a blessing. This increases it value for tourists and gives them a reason to get them as potential souvenirs and collectables.
 |
| fig 2.1 concept reconstruction |
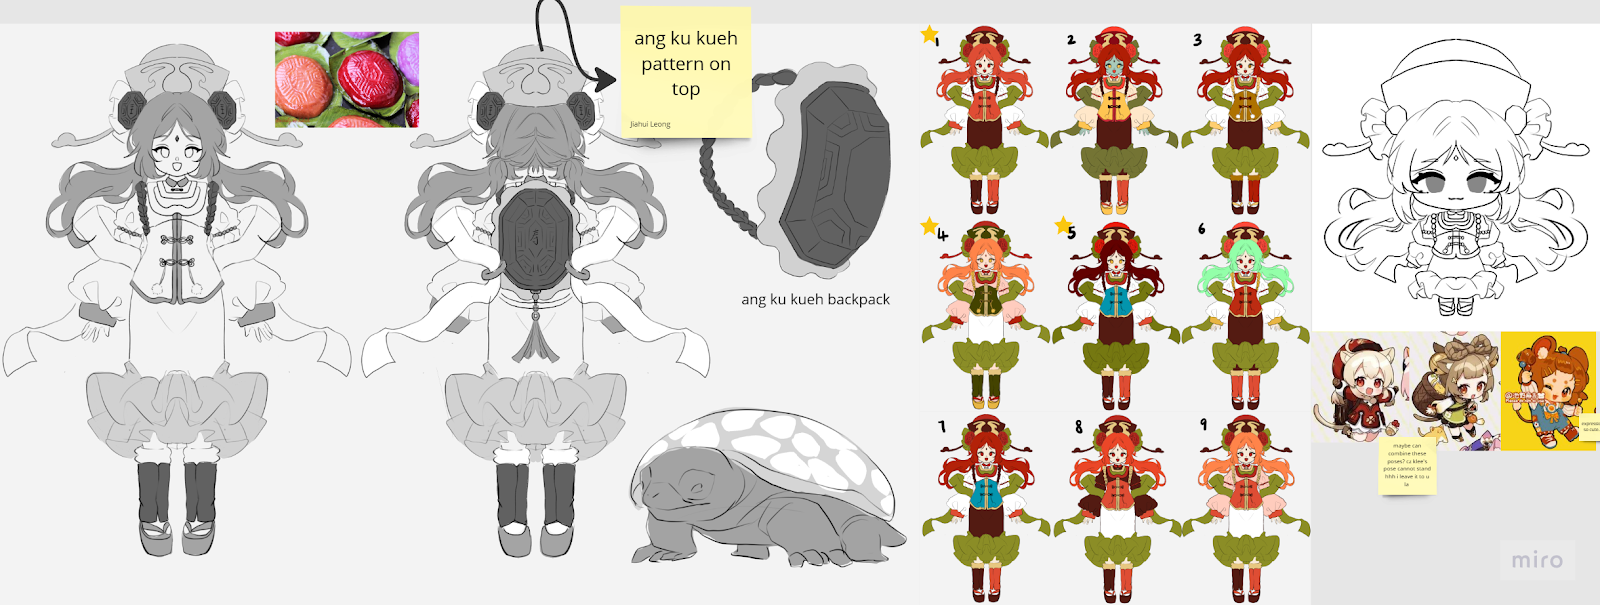
Moving on, we started researching the history and cultural significance of each kuih to better portray them through our designs. With that in mind, we also started compiling moodboards for each character. However, due to limited timing, we weren't able to sketch much designs for all of our 12 characters. We pretty much just freestyle whichever that had some degree of inspiration hit us.
I worked on these 4 kuihs, reimagining them according to their silhouettes and main features. I tried adding a bit more fantasy elements to them to make them more interesting.
 |
| fig 2.2 kuih sketches |
 |
| fig 2.3 3D model on Nomad |
Feedback
Ms Anis
- come up w a stronger rationale, focus more on creating a fun experience
- steer away from raising awareness on kuih
- references on using mascots (japanese mascots)
- Suggest to focus the project on being a fun souvenir & experience for buyers
- Suggestion to build an IP similar to the Sylvanian families, but localise it so maybe something like kampung
Mr Kannan
- Determine our target audience & age group
- Think about what problem the project can solve
- Think about the sustainability of the project. Can it be repurposed for other causes? Further developed into different series?
- Build up character lore for each character. Give them a story and think of it as creating an IP.
- Show sketches next week to give a more solid idea of the project’s look & feel.
Week 3
This week, I worked on finalising the design for Kuih Bahulu so Raemi could start working on the 3D model. We find this work mode a lot more efficient rather than working on all the sketches at once first and then the 3D later. Worried about how the design might not translate well onto a small figurine, I decided to keep everything simple. However, we later realised the character lacked some complexity, that the simplicity was not unique enough to hold its own.
 |
| fig 3.1 kuih bahulu character sheet, chibi reference and splash art draft |
I also started working on some possible colour combinations for the character, but none of them are quite hitting the way I hope they're hitting.
 |
| fig 3.2 kuih bahulu colour tryouts |
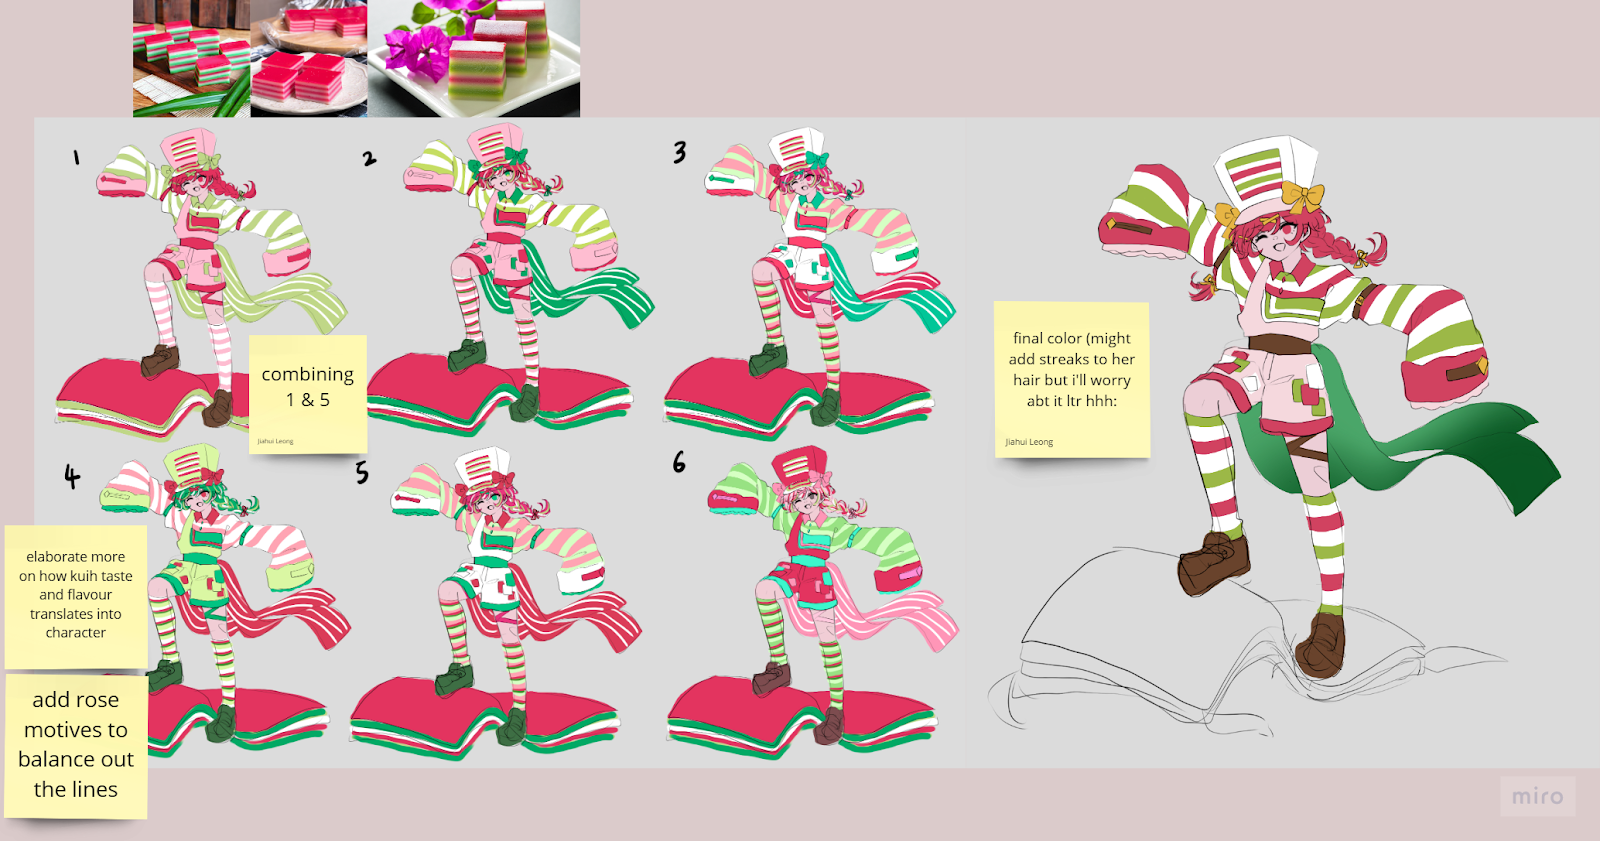
Moving onto the next character, I started working on Kuih Lapis. I wanted to capture her youthfulness and playfulness through her outfit, while also portraying the layers of kuih lapis prominently in the design. I added a flowy ribbon to the outfit to complement the "magic kuih lapis carpet" prop that I gave to the character.
 |
| fig 3.3 Kuih lapis character design sheet |
On the 3D side, Raemi made good progress in sculpting Kuih Bahulu into our figurine style. We also tried out the colour schemes on the figure, and it further confirms to us that this colour scheme simply does not work, good lighting or not. We will have to try to fix both the design and colour scheme next week. It was also confirmed that we will be doing our presentations on Week 7, so we will have to start working on getting our slides ready.
 |
| fig 3.4 Kuih Bahulu 3D progress |
Feedback
Ms Anis
- Look up other heritage dolls as a reference when pitching
- Go wild on the fantasy elements for character design. It doesn’t have to make sense.
Mr Kannan
- name the series and brand
- presentation should emphasize the IP backstory to be more convincing
- come up with a potential merch line & world expansion
- Determine story & primary target audience
- think about how promote and build a following for the brand
- think about customizations & potential skins & outfit change (just a suggestion, need to think further abt practicality)
- if not detachable/poseable, no point separate parts for printing
- Do a test print of model
- Suggestion to do a stop motion animation promo video
- Get a test print model done by W5 for test print in campus
Week 4
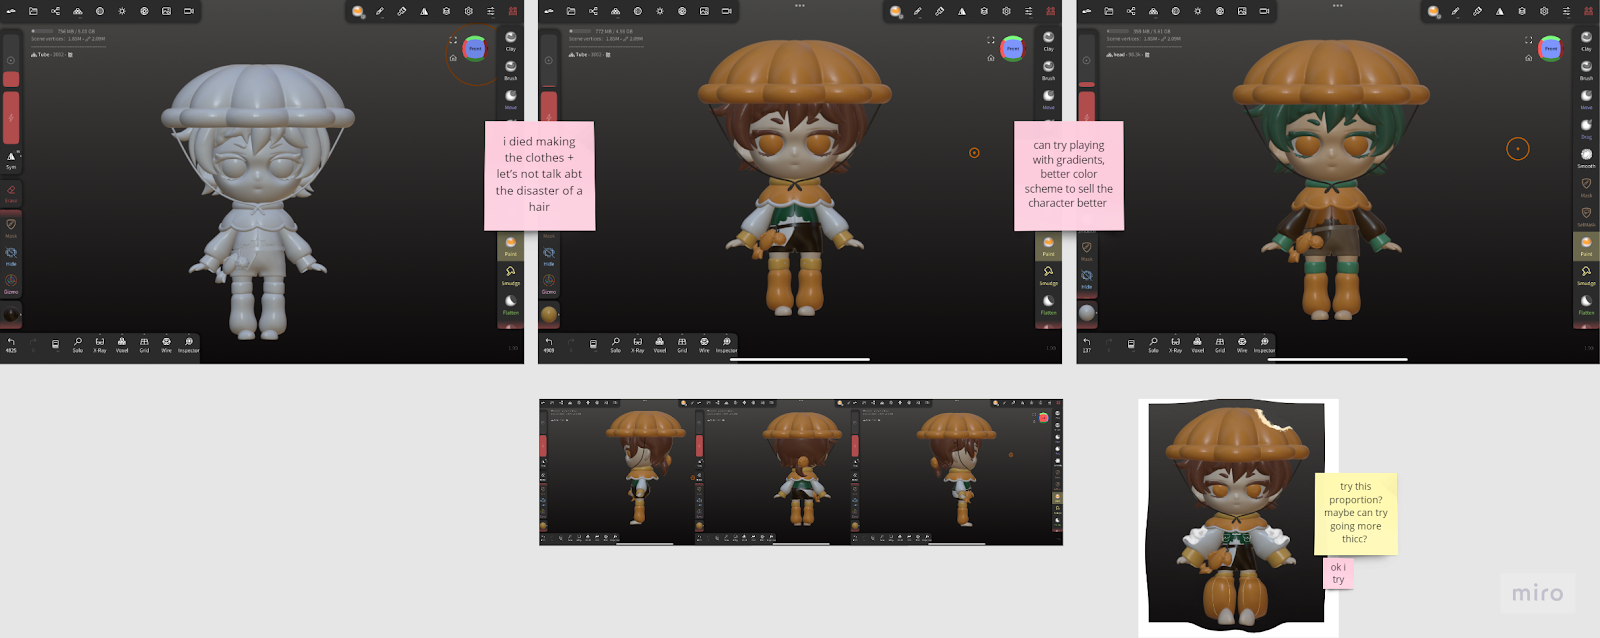
This week, I continued working on the colour palette for Kuih Bahulu. Following the feedback from the previous week, I worked with more warmer tones. I also tried out slightly different shapes to give some variation to the silhouette.
After some discussion with Raemi, we decided to go for option 3, which gives more contrast in our opinion. Then begins the rendering. We wanted to polish up kuih bahulu so we will have a complete set of outcome for our proposal presentation.
| fig 4.1 Kuih Bahulu sketches |
On raemi's end, she adjusted the model's proportions based on the changes we discussed previously. Now the model looks more chubby and cute and in line with the look and feel of what we want for the dolls. I really liked how the model turned out.
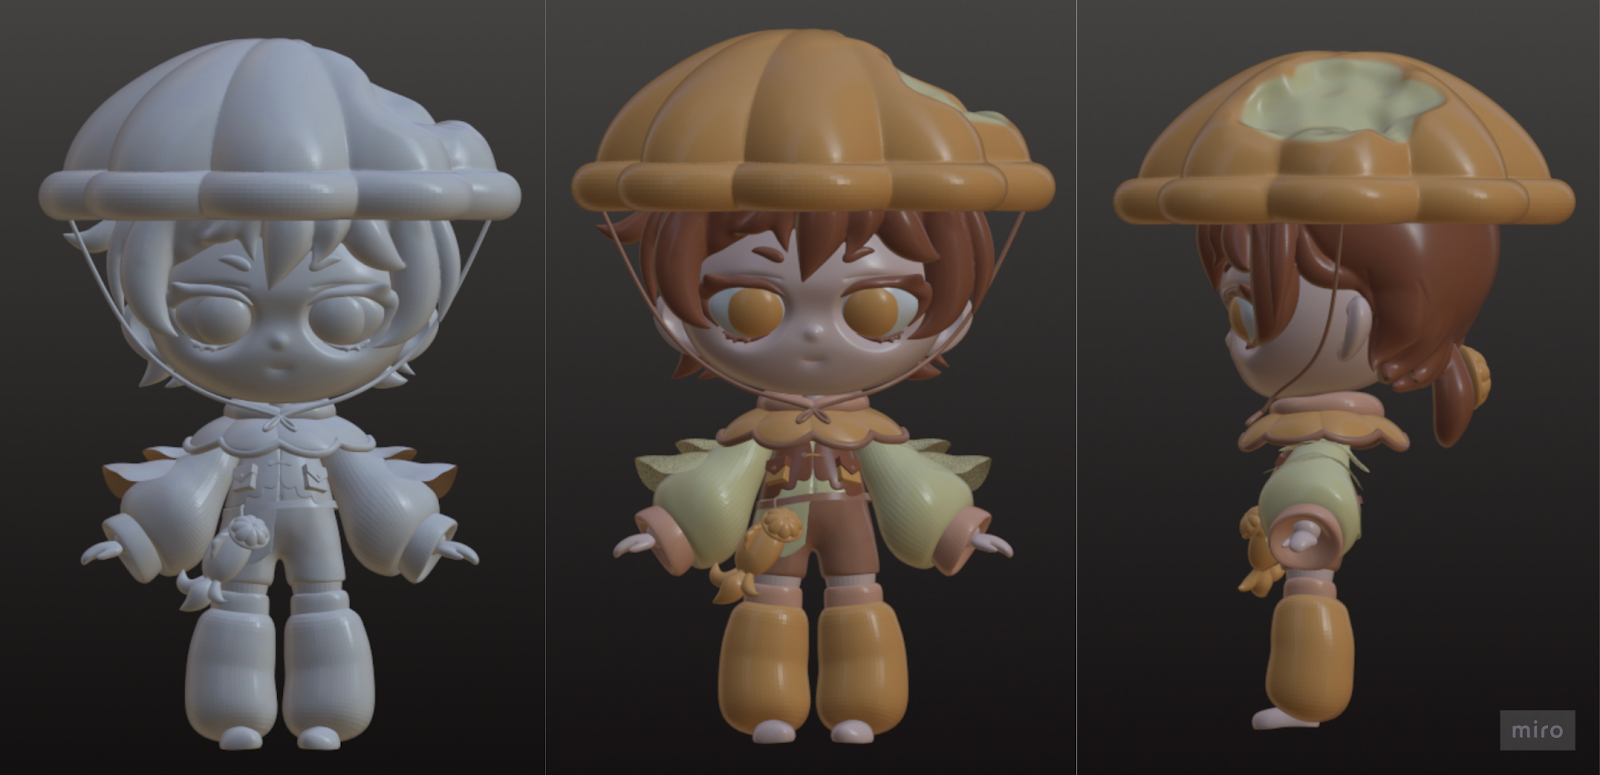 |
| fig 4.2 Kuih Bahulu 3D chibi |
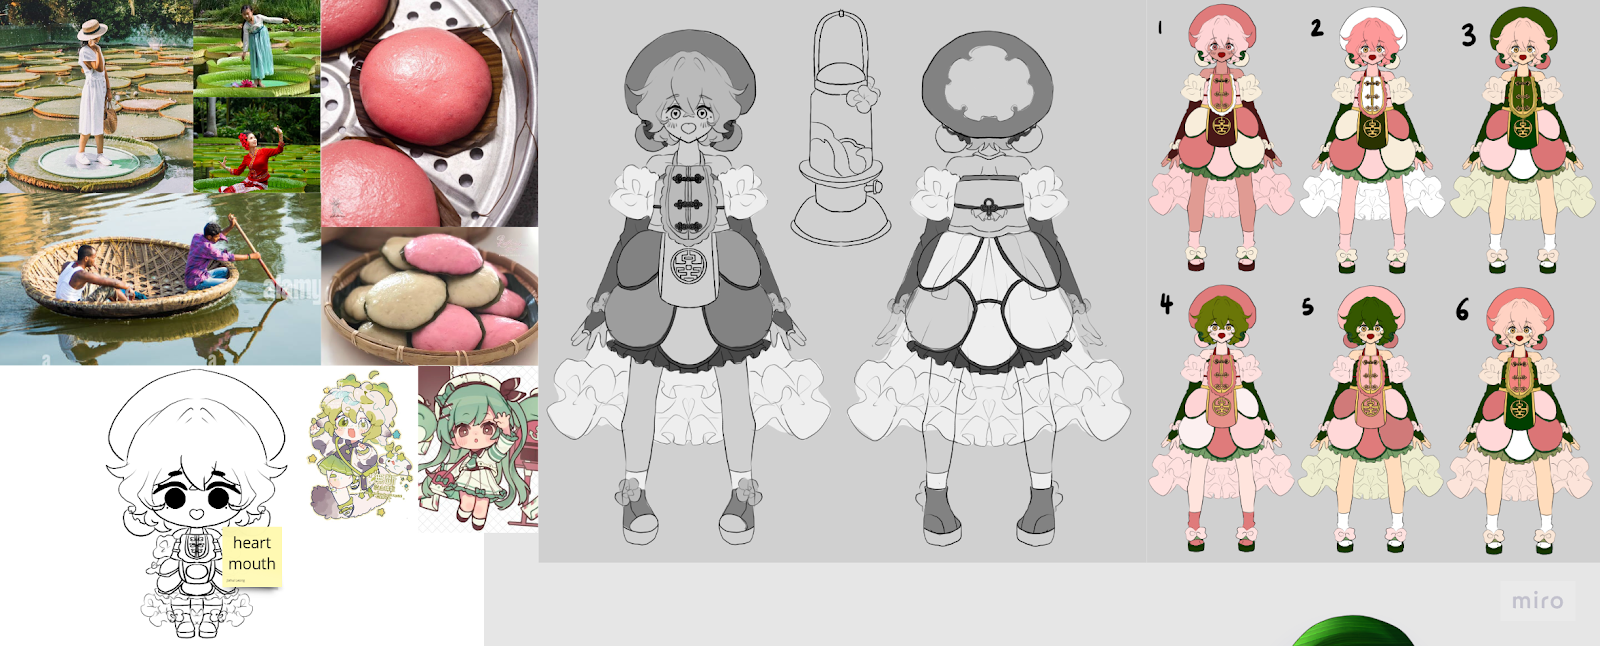
I also worked on some silhouette sketches of other kuihs. This week was a bit slower as I wasn't able to work during the weekend. I did character sheets for Palkova and Kuih Lapis. I realised that I implemented the kuih element mostly in the hat, and am now debating whether i should make that a running theme or branch out to other parts of the character for the rest of the lineup.
 |
| fig 4.3 character sketches |
 |
| fig 4.4 chibi silhouette test |
Feedback
Ms Anis
- More details is needed to make the character pop
- Try a better colour scheme for Kuih Bahulu
- Consider giving the model a subtle get impactful pose. Hero pose at the moment seems a bit huge to produce and may seem unbalanced when lined up with the rest of the dolls
- Proposal should include 2-3 character examples, will be presented to lecturers that are completely unfamiliar with our project
Mr Kannan
- Can try out better colour scheme to sell the character better
- Try out gradients
- Not enough distinctive feature for kuih bahulu
- Consider exaggerating body parts of the model (ex: big feet)
- Give characters different body types to showcase difference in personality?
- Use adobe colour/ dribbble to generate more
- Draw over the 3D model to explore more designs
- Make sure to test out the silhouette
Week 5
This week, I worked on finalising Milk Peda's hero pose. I also tried out different colour schemes, but most of them did not encapsulate Milk Peda's essence. Ms Anis recommended us to actually try the kuih to be able to translate not just the look but the taste and texture into the character.
 |
| fig 5.1 milk peda (palkova) design |
Feedback
Ms Anis
- exaggerate the pose & expression a bit for the hero pose
- a bit more accent colour (add some red)
- market it as collectables & local identity
- come up with a different name
- Try out vibrant and fun pupil shape, making eyes more expressive
Mr Kannan
- Overlay (paint over) gradient over the 3D model to see the colour effect
- can make the figurines one color (spray paint it gold/silver) and brand it as pewter Selangor if the cost is too high
- Cut out inner hidden parts for printing to save cost, make sure no gaps tho
- Make sure to get a quotation and the processing time this week
- Try out IdeaMaker to test whether the file is printable
Week 6
This week, we finally started looking into the 3D printing process. After downloading IdeaMaker, I threw Bahulu in and tested it out. After asking around 3D printing suppliers online, we decided to stick with the campus' 3D printing for now, as one model will cost almost RM300, and we have TWELVE. The 3D printing on campus uses filament and will give us a hell lot of work (spoiler), but that's something we're willing to sacrifice to save money.
 |
fig 6.1 IdeaMaker testing |
 |
| fig 6.2 Colour try outs kuih lapis |
Here's us on the grind to create a branding from scratch one week before the presentation:
fig 6.3 Grinding in the (old😭) SLC
Here is our proposal draft for week 5 & week 6:
Before our proposal presentation the following week, I was ambitious enough to animate kuih bahulu, as it was a planned outcome. However, this will be the first and last time you see our Rasas animated, due to the many many reasons and hardships we faced in the following weeks. It was a necessary sacrifice.
fig 6.4 Kuih bahulu animation
Feedback
Ms Anis
- For presentation, focus more on the project instead of the wordy parts. Many parts can be combined and simplified
- It would be better to include the naming and branding overview in the proposal presentation
Mr Kannan
- Overlay some gradients to give the colours a bit more depth and pop
- Can consider printing and painting one figurine, and spraying the rest a solid colour if budgeting constraints
Week 7 & Week 8
Proposal presentation to Mr Kamal went well. We introduced the blindbox concept to him and explained our project. Conversations with him gave me more insight on how we could potentially expand our brand, and to better identify our target audience so our brand can resonate directly with them.
Major Project Proposal by Jiahui Leong
Major Project Proposal by Jiahui Leong
With that said, we started working on finalising our Kuih Bahulu and Kuih lapis models to be sent for printing. This was my first introduction to Mr Ahmad from the engineering school, our 3D printing MVP who was one of the main people behind Rasa seeing the light of day.
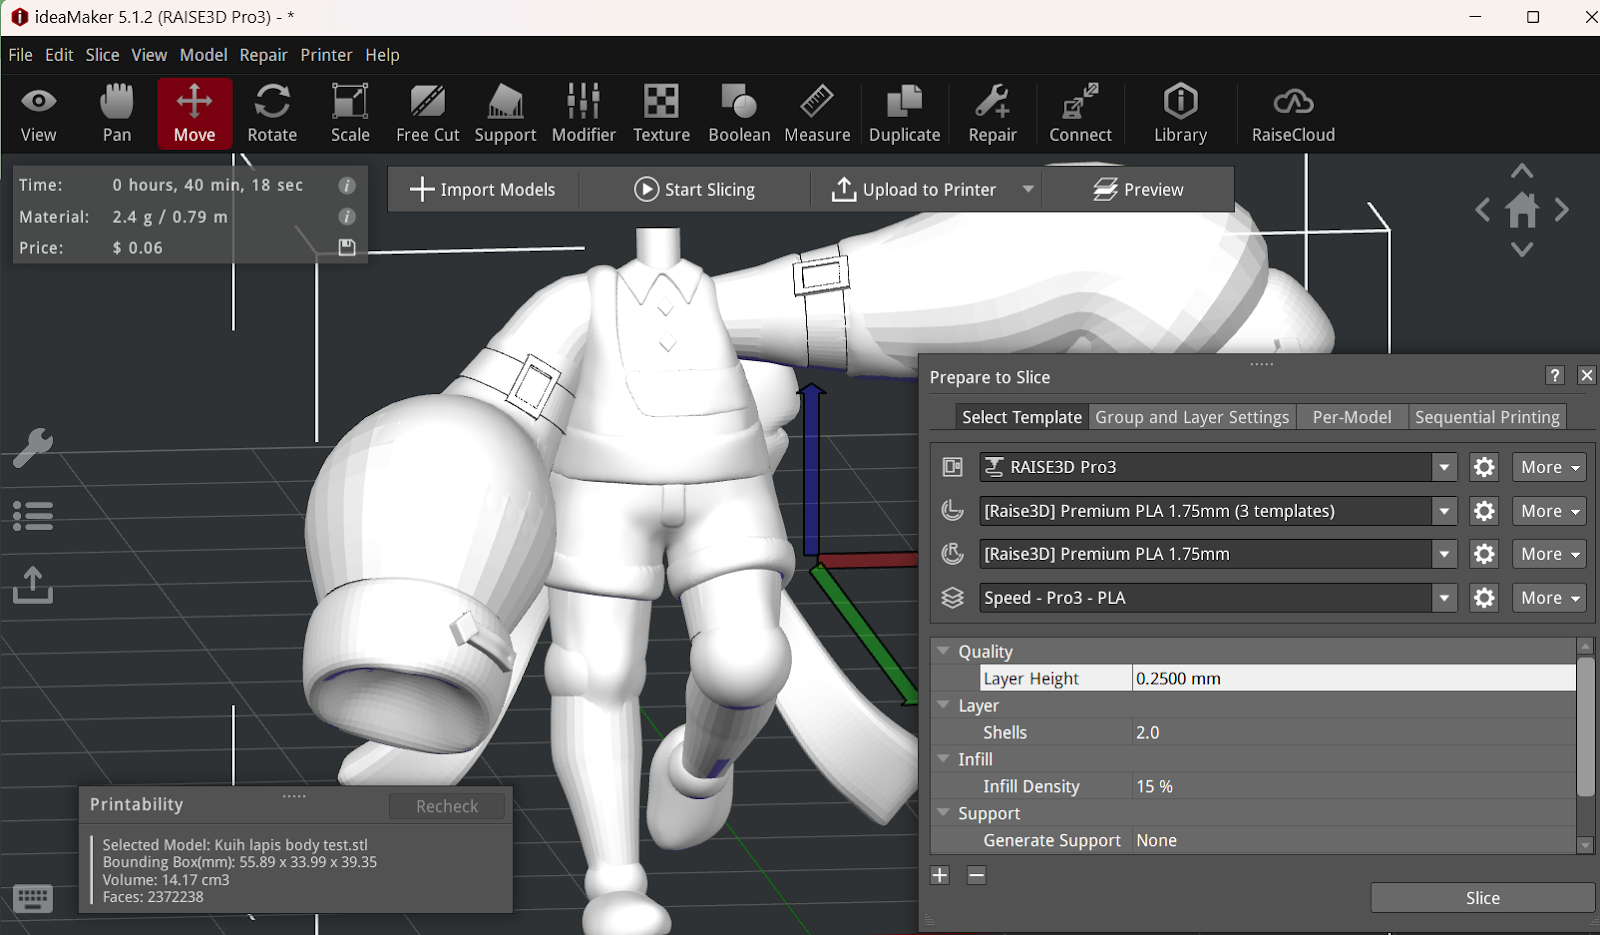 |
fig 7.1 finalising Kuih Lapis for printing |
This was also the week of our FYP showcase- Highlight's fundraising event, so I was running on 3hours sleep a day and officially hit the first artblock of this FYP. I've designed and redesigned Onde-onde (my favourite kuih irl, btw, expectations are high) and I still could not reach a satisfactory look.
 |
| fig 7.2 onde-onde ver 1 |
I will have a separate section sharing my experiences with the 3D printing, sanding and painting of models below, because it's on a whole other trajectory that I did not expect myself to venture on this major project.
 |
| fig 7.3 Figurine 3D printing 1st attempt |
Feedback
Mr Kamal
Week 9
This week was a lot of grinding out character designs for Raemi to model. Given the amount of hurdles we are facing with the 3D printing, it's best to get the designs out of the way so we have time to focus on creating the actual prototype for the showcase and final presentation. Technically, the figurines are our main outcome for this project.
Finalise Ang ku kueh design
Finalise hee pan design
Finalise Pulut Taitai design

Finalise Bingkai Ubi design

Feedback
Ms Anis
- Onde-onde design works, can add some more white (maybe socks?) to balance out the bottom
- Good progress :D
- Keep working on getting the figurine done
Mr Kannan
- Think about how we want to sell the idea when we present, don’t just focus on making eye candy without a deeper substance
Week 10
This week I finalised onde-onde design. I feel like I finally got it right this time.
 |
| fig 10.1 onde-onde character sheet |
 |
| fig 10.2 Pulut Inti character sheet |
 |
| fig 10.3 Kuih Kesari character sheet |
I also worked on brainstorming some packaging and merch designs while Raemi continued to work on the 3D models. Due to the limited time we have left, I am considering something easier and faster to get done, while still looking aesthetically pleasing and fits our theme.
 |
| fig 10.4 merch, packaging and display ideation |
Feedback
Ms Anis & Mr Kannan
- Think about the keepsake value for packaging
- Consider utilizing banana leaf pattern?
- Work on the models and the packaging simultaneously
THE PROTOTYPE
Full disclosure that I have zero experience in model painting or anything related. I am also an overambitious person who likes to prove people wrong, so whatever suffering I endured creating these prototypes, I did to myself. This journey wouldn't have been a fruitful one without all the support from my family, friends and Mr Ahmad.
I started this journey on Week 8, but the real work didn't officially start until week 9.
Here is a photo documentation of how it all started:
 |
| fig 11.1 first prototype |
fig 11.2 skinning kuih bahulu
First time removing the honeycomb was a scary process, a process which I will grow more familiar with every model I print and reprint. I learned that filament is actually a very strong material, and as long as you're not printing something that's thin asf, it will not break. Even if it does break, its nothing superglue cannot fix (i spoke too soon) Pulling out honeycomb itself is like opening up a blindbox, figurines often will not be printed completely, and need to be reprinted #justfilamentthingsThe many many DIY gundam videos I watched to prep for this process were apparently still not enough, because the first figurine started out ROUGH. The process goes like this
Remove honeycomb > Sand > fill in dents and holes with putty filler > sand more > primer > Sand even more > paint > Lekar coating
Now rinse and repeat that process for all 12 models.
fig 11.3 filled and partially sanded model
To make sanding and painting easier, we started printing the body parts separately. Honestly, I was very delusional from the beginning to the end of this project. Even though we aim to produce 6 models for showcase due to time constraints, deep down, I always wanted to do all 12. And this video is a testament to me that it was possible. I dragged my friends and family into helping me out with the sanding because I sure as hell won't be able to finish this alone. Sanding takes A LOT of time and energy.
 |
| fig 11.4 the first 3 children! |
 |
| fig 11.5 painting process |
fig 11.6 painting process in the 3D lab
The results however... was not great. It looked like a kindergartener's work, not one of a design student. We are on week 11 at this point, and Ms Anis asked us to reconsider the model painting, and focus on quality instead of quantity. Perhaps send the models for resin printing instead.
I however, just got some advice from a friend who was really into miniature painting, and am now very adamant that I can make this work. Printing these models on campus is free, I am not about to spend RM300 for each model, and only print 6 of them. The resin printing did not include colour either, so what if the problem was in the colouring? It would be a waste of RM300 now wouldn't it?
Raemi and Ms Anis were sceptical about my delusional optimism, even to the point of suggesting acrylic standee or cardboard cut out alternatives in place of figurines. But as disclosed in the beginning, I am a stubborn person that will do anything to prove doubtful people wrong, so I powered on. Realistically speaking, Ms Anis was giving rational suggestions to maximise our project outcome, but I was the one who sanded and painted everything, so if my gut tells me I can make this right, I shall prevail. Thankfully Raemi decided to trust and fuel my optimism, and we made a deal -- to give me one more chance to prove that this can work.
 |
| fig 11.7 failed children |
 |
| fig 11.8 1st successful prototype! |
 |
| fig 11.9 kuih lapis glow up |
 |
| fig 11.10 figure painting process |
Then, another issue arises: stability
 |
| fig 11.11 figurine stand |
All things considered, it was a challenging 2 months but a very fruitful one. I am so glad I decided to push for model printing on campus and made it happen! I also got to spend a lot of time with my friends and family (my dad is the MVP in this entire thing) through this project that I hope was a memorable part in their uni life as well 🙏🏻💖 Here is the quick BTS video I managed to put together the morning before the showcase:
THE SHOWCASE
Final Presentation Deck:
RASA key visual:

RASA showcase video:
RASA models turnaround:
RASA booth: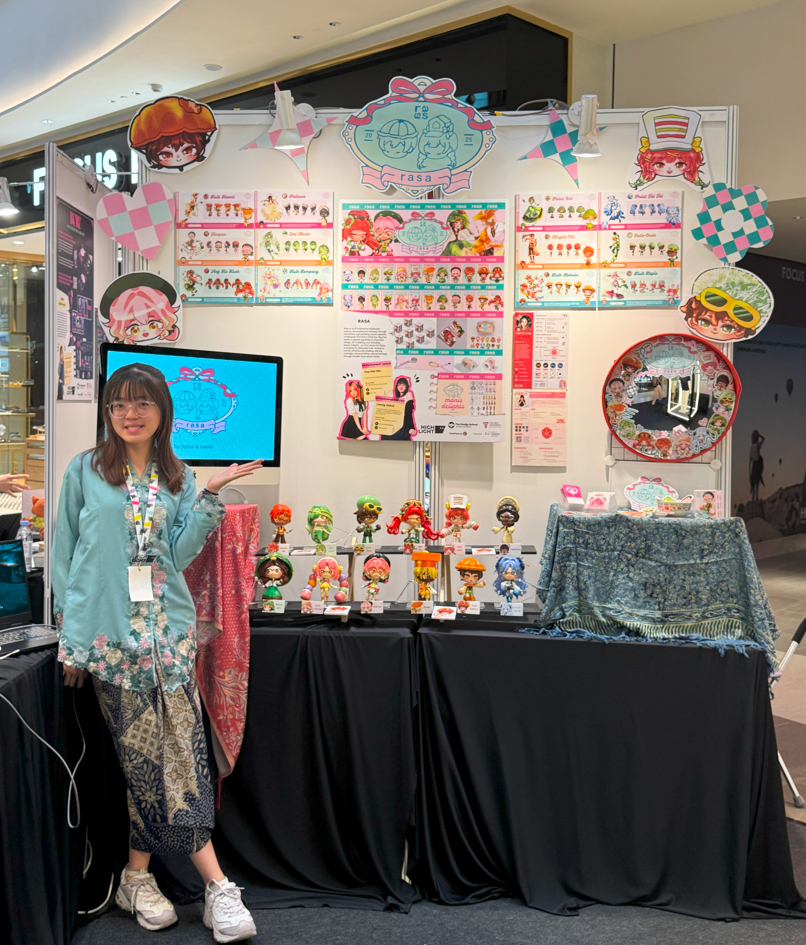


THE RASA mirror:

FINAL THOUGHTS (and prayers)
Just like that, my 3 years of uni comes to an end. It was very bittersweet that I wasn't able to pour my full heart and time into RASA because I was breaking my back carrying Highlight at the same time, but this combination sure made my final semester one to remember.
I'd like to extend my heartfelt gratitude to my dad for his endless support and trust in my project, for fueling my ambitions and funding them too, my biggest cheerleader, sidekick and enabler. He sanded most of my models, especially towards the end where I focused more on painting (2hours wait after every coat means every second counts), and he also built the rack that my children stood on, assembled the acrylic stands, and figured out how to hang the mirror on my booth. He also came physically to help me out with the set up of my booth and dismantling it too, because I was so busy running around making sure Highlight was running smoothly. He is the unofficial 3rd member of this project, and for that, I am forever grateful.
I'd like to thank my partner in crime next, Raemi, thank you for doing this with me! Rasa wouldn't be complete without you, and I'm glad we're both driven in making Rasa the best it can be. It was such a shame that you couldn't make it to the showcase but don't worry! I made sure to take care of our children and promote them well 🫶🏻
Next to Mr Ahmad, for letting me barge into your lab every other day, to check on my children and yap with you. For letting me cut the queue for urgent printings and using the engineering school's 3D printers cause the design school only has one. It was only 2 months that I got to know you but it felt like we were old friends. I hope onde-onde will keep you company during work, please take good care of him, he's one of my favourites!
Ms Anis and Mr Kannan, your guidance and support towards RASA was invaluable, having 2 kickass lecturers who have been through it all with you throughout your uni years as your FYP supervisor is THE BEST. You are the beginning and the end, I will miss you both dearly.
My honeycomb partner (my yinyin) Qiao Yin, my sanding OL gang Khye, Ameer, Yen Ee and Yanling, and my acrylic paint sponsor Chloe, we were a bunch of mismatched friends that weren't the closest before but grew a lot closer through this project was the least expected by-product of RASA. I don't know how I managed to rope y'all into being free labours for my FYP, but I had the best time hanging out with you guys every Friday. Thank you for caring for me and in turn caring for Rasa, and made Rasa possible!
To end it off on a positive note, this project goes against all the things an FYP should be (trying something completely new/ unconventional for the industry/ large focus on the final product), and yet against all odds, manages to emerge victorious. The positive feedback I received during the final presentation, then followed by the enormous positive attention at the showcase gave me a lot of confidence and dopamine, making the months-long battle worthwhile. I'll try to gather everything in a pitch deck and perhaps try my luck at sending it to blind box companies because why not? I've got nothing to lose.
Rasa will forever be a project I'm proud of, it was my blood sweat and tears, my children, all 12 of them. Thank you for allowing me to end my uni life with a bang.
Rasa signing off for now.
Comments
Post a Comment